
Introduction
The ISS is humankind’s only (current) permanent home in space. Many of the engineers and astronauts that live and work on and with the ISS are into all sort of geeky hobbies, including Amateur (Ham) Radio. As such there are often chances to hear broadcasts from the ISS as well as much rarer chances to chat. For 2-meter SSTV they are using a commercial Kenwood TM-D700 radio limited to 25 watts of power. 25 watts may not sound like a lot, but remember what kills your VHF signal is line of sight, not atmospheric absorption. When you are listening to the ISS there are no obstructions between you and the station. There are many reports of people copying the SSTV images using cheap handhelds with whip antennas.
Items Needed:
- The ISS must be transmitting SSTV
- The ISS doesn’t transmit SSTV all the time. They publish the schedule on the Amateur Radio on the ISS (ARISS) web page.
- The ISS must be in line of sight with your location
- Many websites track the ISS, my favorite is Heavens Above . Put in your physical location and remember to select “all passes” it defaults to naked-eye visible.
- A radio and antenna capable of receiving FM audio on 145.8 MHz
- As you will be listening only, a scanner may be used, and you need no radio license to listen! There are reports of people collecting the signal with the under US$50 BaoFeng radios. (Amazon Link). In this article I used my main rig, a Yaesu FT-991A (Amazon Link) . Connected to a dipole antenna in an inverted “V” configuration. A configuration designed to have the highest gain lobes pointing horizontal not vertical!
- A computer or mobile device with audio input
- I’m lucky in that my radio has a direct USB connection that shows up as a sound card on the Mac with no additional drivers. However, as long as your radio has some kind of line out or headphone jack you should be able to interface it to your computer
- Software capable of decoding the SSTV PD-120 signal
- On the Mac the most robust software is the non-free “Multimode Cocoa” . The cost is US$90, but you can use the free trial version with “nagging” and a time limit of use. Despite the high cost, this is the most full featured digital decoder I’ve seen on the Mac. You can search for “SSTV decoder” for your OS, including iOS and Android mobile devices!
Procedure:
Now that we have all our devices, we’re ready to try our hand at looking at TV from space! I’m assuming here that you have your radio setup for FM, 145.800MHz, your antenna has a good view of the outside sky and your audio is working from your radio to your computer. This audio connection is important, as any distortion will show up directly on your image. I recommend taking an audio recording (Quicktime player is included with macOS and has a built-in audio recorder). If your radio supports commercial FM radio stations, I would tune to one of those and adjust your audio input until the audio on your computer sounds perfect. No clipping from too much gain, and the audio loud and clearly audible.
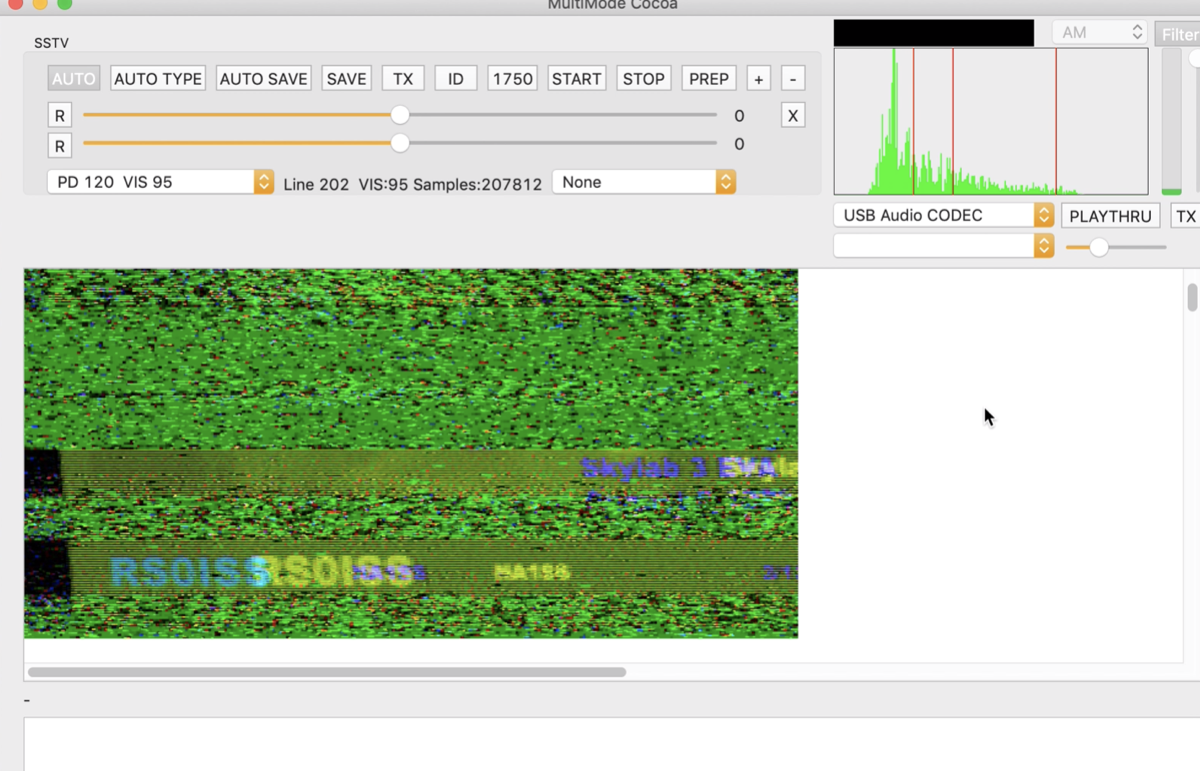
Set your software to PD-120 mode. In Multimode this is accomplished via a menu in the menu bar (Mode->SSTV) then chose PD-120 VIS 95 from the mode list in the window.
Now we wait until your radio starts to pick up the SSTV signal. You may need to adjust the frequency a bit to peak out the signal, keep in mind that the ISS is moving fast enough to notice a doppler shift. The signal will will appear about 3.5kHz HIGHER on the approach, and about 3.5kHz LOWER on the departure as compared to your location. You can tell when this will occur from pass details from a site like Heavens Above:
In reality with a 25 watt FM signal that already has a 5kHz modulation index, your radio will probably lock on if you leave it at 145.800, in fact my radio didn’t even offer the ability to change 2m signals by such a small frequency amount.
On the first pass by the time I got everything set up the ISS was almost out of range, but I got the below image which was enough to motivate me to try again the next day.
Maybe it’s time to take a break and think about where the signal is coming from. The ISS is using a 1/4 wavelength whip antenna for 2m. You’ll notice one of the antennas is much longer, intended for 10m use, but there is no current radio on board to drive it.

Back to collecting the signal! The ISS isn’t rotating in a traditional sense, but it is rotating angles compared to you on the ground as it travels across the sky at many degrees per minute. The best antenna would be a circularly polarized Yagi with a little bit of gain that tracks the station. That requires a computer controlled gimbal or a patient and steady-handed assistant with a tripod. I’m going to try again with my trusty dipole.
I recommend having everything turned on and tuned up a half hour before the start of the ISS pass. Keep in mind that the transmitting radio is also not on 100% duty cycle, from the passes I’ve listened to it seems like 4 minutes on, 2 minutes off. Enough to pretty much guarantee one clean image per pass. (the 120 in PD-120 is the # of seconds, so a complete image will take 2 minutes to come in).
Record the Audio!
So in addition to “live” processing the signal on your computer, I recommend recording the entire pass in a lossless format (8 bit NIST WAV @44.1kHz seems to be what most of the tools want). My pass the next day left me without much to look at, but it turns out that I needed to work some of the skew options to get the picture clear. In the end I captured a fairly nice shot:

Here is the raw “.wav” audio file from the above image if you want to try and recreate it with your own software.
Here is the audio as an MP3, if you just want to hear what the signal sounds like. Cleanest copy starts around 1 minute in.
Conclusion
Collecting SSTV from the ISS was fun. There were a fair amount of challenges mostly with the software. If they do another run of SSTV I will be listening again and trying new ideas and maybe an antenna with a little more gain skyward.